How to Properly Configure a Network With a Mikrotik

21/12/2022

MikroTik RouterOS™ is an operating system and software that can be used to turn computers into reliable network routers, including features made for IP networks and wireless networks, suitable for use by ISPs and hotspot providers. For Mikrotik installation, no additional software or other additional components are needed. Mikrotik is designed to be easy to use and very well used for computer network administration purposes such as designing and building a small to complex computer network system.
In this discussion, we will explain how to configure a proxy, namely using a topology like the one below:
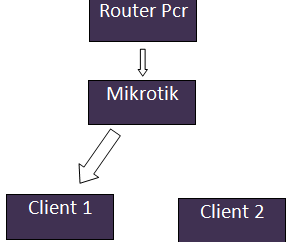
for Client 1 it connects to ethernet 2 in the proxy and then, for client 2 it will connect to ethernet 3. the configuration is described in the steps below:
Now we use the Winbox application to configure, Winbox is a utility for Remote GUI on Mikrotik via the Operating System Window. Make sure the Winbox software is already on your PC. If so, run it, the display will appear as below.

Enter the mac-address that matches the proxy used or you can click the small box next to connect to see the mac-address of the proxy. then click connect
Then the initial display will appear as below.

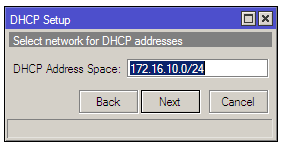
After the display appears as above, select interfaces, it will appear how many interfaces are in our proxy. because we use ethernet 2, it can be seen in the picture that only ethernet 2 is active. and for wireless just turn it off because we don't use it.


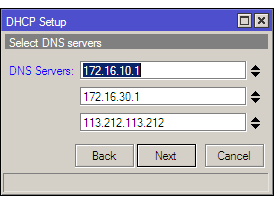


It can be seen in the command prompt that the DNS SERVER AND THE GIVEN IP have been configured


And it will automatically connect and enter on leases. like in the following picture


Please try and hopefully useful